Saturday, August 28, 2010

Page Navigation with number For Blogger

Page navigation is need for all blogger because it can make navigation easy for your visitors.


To see the result go my home page.
 
 
Step 1 : Apply Style

  1. Login to Blogger Dashboard and navigate to Layout > Edit Html
  2. Don’t click the checkbox which says ‘Expand Widget Templates’
  3. Find this 
]]></b:skin>
and replace it with
.showpageNum a {
padding: 3px 8px;
margin:0 4px;
text-decoration: none;
border:1px solid #999;
-webkit-border-radius:3px;-moz-border-radius:3px;
background: #ddd;
}
.showpageOf {
margin:0 8px 0 0;
}
.showpageNum a:hover {
border:1px solid #888;
background: #ccc;
}
.showpagePoint {
color:#fff;
text-shadow:0 1px 2px #333;
padding: 3px 8px;
margin: 2px;
font-weight: 700;
-webkit-border-radius:3px;-moz-border-radius:3px;
border:1px solid #999;
background: #666;
text-decoration: none;
}
]]></b:skin>


Step 2 : Aplly Javascript

Find This :
</body>
Replace with :
&lt;script type='text/javascript'&gt;
var home_page=&quot;/&quot;;
var urlactivepage=location.href;
var postperpage=7;
var numshowpage=4;
var upPageWord ='Prev';
var downPageWord ='Next';
&lt;/script&gt;
&lt;script src='http://scriptabufarhan.googlecode.com/svn/trunk/pagenaviv202-min.js' type='text/javascript'&gt;&lt;/script&gt;
</body>
Change based on your blog setting :
var postperpage=7;
var numshowpage=4;
Postperpage : How many Post every Page for your blog
numshowpage : how Many number will show in Your page Navigation
Step 3 : Customize Label
Go to the Edit HTML page and “Expand Widget Templates
Find this (all of this text in your xml or template)
'data:label.url'
and Replace with this
'data:label.url + "?&max-results=7"'
Change 7 base on how many post every page
only That, I hope it can work and make your blog easy to navigate.

Friday, August 13, 2010

Twitter Introduce - Official Twitter Share Button (Tweet Button) for Blogger

For those of you who use Twitter on a daily (or even hourly) basis to share and read information about celebrities, friends, or businesses, you may be interested in Twitter’s new addition — The Tweet Button.

The aim of the Tweet Button is to simplify the sharing of web links by its day-to-day users and web publishers who use the social networking website to distribute information about its products and services.

When the Tweet Button is pressed or clicked, a pop-up box appears where an ‘automagically’ shortened URL of the page or object shared is displayed, Twitter said in their blog post released Thursday.

The Tweet Button also aims to grow traffic to the site and extend the Twitter followers. They aim to do this with publishers having the ability to preconfigue the custom text with every Tweet Button they wish to display to users, as well as the option to suggest other Twitter accounts they may also be interested in.

TweetMeme is another company who have provided similar capabilities, but will now retire and phase out its “retweet” service in aid of assisting Twitter with the growth of the Tweet Button.

It was only a matter of time before Twitter adopted such a service, as Facebook did some while ago with its infamous “Like” button that has also become a favorite on YouTube and many other blogs and social networking websites.

Do you like the new Tweet Button? Will you be adopting it on your website?

To install the new tweet button on blogger, Follow these steps

1. Login to your Blogger Dashboard and Navigate to Design > Edit HTML

2. Click on the Check box which says “Expand Widget Templates”

3. Now Look for
<data:post.body/>
and immediately above it paste the following code snippet(after proper editing)
<div style="float:left;padding:4px;">
<a href='http://twitter.com/share' rel='nofollow' class='twitter-share-button' expr:data-url='data:post.url' expr:data-text='data:post.title' data-count='vertical' data-via='BlogCommander'>Tweet</a>
<b:if cond='data:post.isFirstPost'>
<script type="text/javascript" src="http://platform.twitter.com/widgets.js">
</script>
</b:if>
</div>

4. Save your template.

5. Now you should see the twitter button near each of your blog posts.

Editable parameters

1. float:left - you can change this to float:right if you need the button on the right side of the post instead of on the left

2.data-count='vertical' - you can change this to data-count='horizontal' or data-count='none'

3.data-via='BlogCommander' - you can edit BlogCommander with your twitter user name. So if your twitter handle is michael, then change it to data-via='michael'

4. Adding some extra text in the tweet – With the current code, the button will make a tweet with the title of the blog post. If you want to add some extra text to the tweet, change expr:data-text='data:post.title' to

expr:data-text='"I am Reading: "+data:post.title' This will append “I am Reading:” to the tweet :)

Displaying the Tweet Button on the Post Page Only

If you want to display the Twitter button on the post page only, then wrap the code with conditional tags like
<b:if cond='data:blog.pageType == &quot;item&quot;'>
<div style="float:left;padding:4px;">
<a href='http://twitter.com/share' rel='nofollow' class='twitter-share-button' expr:data-url='data:post.url' expr:data-text='data:post.title' data-count='vertical' data-via='BlogCommander'>Tweet</a>
<script type="text/javascript" src="http://platform.twitter.com/widgets.js">
</script>
</div>
</b:if>

Demos

1.data-count='vertical'


2.data-count='horizontal'


3.data-count='none'


Something more about the Tweet Button
 

Monday, August 02, 2010

Make Money With Your Blog and Google AdSense


AdSense is a great way to get paid for doing what you love to do: blogging! AdSense allows you to show targeted ads on your blog and earn revenue from your traffic. It also helps your visitors find things they may be interested in, based on the content of your blog posts. Best of all, AdSense is free and you have the option to remove the ads at any time.

The AdSense system shows ads relevant to the content of your blog and you can easily customize the look and feel of the ads to match your blog. If your blog is about fashion, you may show ads for shoe designers or clothing stores. If your blog is about cars, you may see ads for car dealerships or auto shops. Using filters, you can have control over the content of the ads you display by choosing to block categories of ads or even specific advertisers.

With the free suite of powerful AdSense reporting tools, you can pull detailed reports that will help you track your revenue and identify opportunities to earn more money. You can see earnings by day, page, domain or specific ad unit and can also use Google Analytics to see the source of your traffic and earnings.

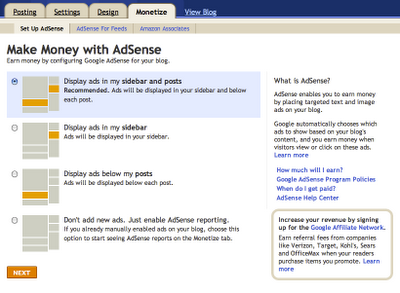
Adding AdSense to your blog is easy. Just follow these steps:

  1. Log in to Blogger, choose your blog, and go to the “Monetize | Set up AdSense” tab.
  2. Choose where you want to show your ads on your blog and hit “Next.”
  3. If you’re new to AdSense, follow the easy online steps to sign up for a new AdSense account. If you already use AdSense, you can log in to AdSense and link your Blog to your AdSense account.

If you’re using a Classic template, you can add AdSense to your blog by following the steps outlined here.

To learn even more, come take a tour with Google AdSense.

Get Related Content for Your Blog with the Zemanta Gadget

About a year ago this blog featured Zemanta, a tool that helps you get more out of blogging. Previously, Blogger users could install a Zemanta browser plugin to recommend content while you blog, enabling you to:

* Read news to learn more about the topic
* Link articles to improve the value of your post
* Use pictures to make your post richer

Today we are pleased to announce that we've teamed up with Blogger to make it easier to use Zemanta on Blogger. To use Zemanta, just follow these three easy steps:


Blogger Buzz: Get Related Content for Your Blog with the Zemanta Gadget